
Laboratory Investigations in Microbiology
|
Laboratory Investigations in Microbiology |
|
As we have seen in the previous exercise, contamination is a serious concern in the microbiology laboratory. However, the risk of contamination of lab cultures or the environment can be greatly reduced by the use of proper aseptic techniques. Aseptic means "no infection" or the absence of microbial growth. Aseptic technique is not just one procedure, but rather an entire way of operating around microorganisms that prevents contamination and infection. The basic principles of this technique include:
The first of these principles can be achieved through proper hand-washing and disinfecting your lab bench before and after lab. Use hot water, soap and a brush for most effective hand washing. To disinfect your lab bench, pour/squirt some lab disinfectant on the lab bench and wipe across the entire work surface using a paper towel.
 Minimizing
exposure of culture media to the air and to contact with any foreign objects
will also greatly reduce the chance of contamination. Keep test tubes capped
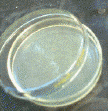
and Petri dishes closed except for the few seconds it will take to transfer
cultures into and out of them. When performing streak techniques on an agar
plate, use one hand to hold the Petri dish lid between the agar plate and your
face (kind of like a sneeze guard at a salad bar!). Avoid touching the agar
surface unintentionally , especially with your fingers! Other things to avoid:
tipping over liquid media (may cause backwashing of contaminants from the cap
into the broth), sniffing media, and repeated/unnecessary opening and closing
of tubes or plates. One other technique that reduces the risk of contamination
in test tubes is passing the mouth of the test tube through the Bunsen burner
flame after uncapping the tube and again
Minimizing
exposure of culture media to the air and to contact with any foreign objects
will also greatly reduce the chance of contamination. Keep test tubes capped
and Petri dishes closed except for the few seconds it will take to transfer
cultures into and out of them. When performing streak techniques on an agar
plate, use one hand to hold the Petri dish lid between the agar plate and your
face (kind of like a sneeze guard at a salad bar!). Avoid touching the agar
surface unintentionally , especially with your fingers! Other things to avoid:
tipping over liquid media (may cause backwashing of contaminants from the cap
into the broth), sniffing media, and repeated/unnecessary opening and closing
of tubes or plates. One other technique that reduces the risk of contamination
in test tubes is passing the mouth of the test tube through the Bunsen burner
flame after uncapping the tube and again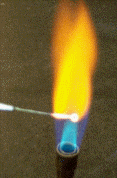 just before recapping it.
 Thirdly, all media, glassware, and tools MUST be sterile (devoid of any
living organism). To achieve this, glassware (pipettes, Petri plates) is usually
baked at 160 °C for 2 - 4 hours. Culture media and plastic ware are sterilized
by autoclaving
for 15 - 60 minutes. This temperature sterilizes liquids, melts agar so it can
be poured into dishes, and kills microorganisms without melting plastic or
boiling off water. Other tools for use in microbiology (especially inoculating
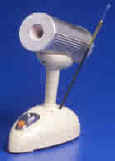
loops & needles) are sterilized before and after each use with a Bunsen
burner flame or a Bacticinerator. A bacticinerator heats metal wire
with infrared in an enclosed chamber without the hazards of having an open
flame in your work area. We will be using the Bacti-cinerator for most of our
experiments.
Thirdly, all media, glassware, and tools MUST be sterile (devoid of any
living organism). To achieve this, glassware (pipettes, Petri plates) is usually
baked at 160 °C for 2 - 4 hours. Culture media and plastic ware are sterilized
by autoclaving
for 15 - 60 minutes. This temperature sterilizes liquids, melts agar so it can
be poured into dishes, and kills microorganisms without melting plastic or
boiling off water. Other tools for use in microbiology (especially inoculating
loops & needles) are sterilized before and after each use with a Bunsen
burner flame or a Bacticinerator. A bacticinerator heats metal wire
with infrared in an enclosed chamber without the hazards of having an open
flame in your work area. We will be using the Bacti-cinerator for most of our
experiments.
Transfer of bacterial cultures from one medium/location to another should be
done with caution and efficiency. The techniques discussed here can be adapted
to 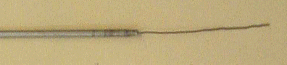 transfers
from plates to broths, slants to plates, etc. At times, a different tool (e.g.
inoculating needle) can be used, for instance when it is desirable to
stab-inoculate a medium.
transfers
from plates to broths, slants to plates, etc. At times, a different tool (e.g.
inoculating needle) can be used, for instance when it is desirable to
stab-inoculate a medium.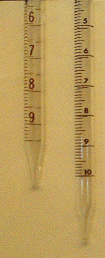
Yet another transfer tool common to Microbiology is the pipette. When using
glass pipettes, pipettes are heat-sterilized in metal canisters. Pipettes should
always be tip-down in the can to avoid contamination of the pipette when
removing the pipette from the can, and the tips of pipettes should never be
touched to skin or lab benches. There are two types of pipettes commonly in 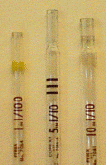 use:
the blow-out pipette and the to-deliver pipette. Blow-out pipettes require that
every last drop is pushed out of the pipette to obtain the desired volume - the
"10 ml" mark on a 10 ml pipette is the tip of the pipette itself!.
To-deliver pipettes require you to leave the remainder of the liquid below the
"10" mark in the pipette as waste - the "10 ml" mark can be
seen near the tip of the pipette. [Pipettes
come in 1 ml, 5 ml, and 10 ml sizes. Be sure to always check for the size of
your pipette by reading the numbers at the top (the number before the word
"in")]
use:
the blow-out pipette and the to-deliver pipette. Blow-out pipettes require that
every last drop is pushed out of the pipette to obtain the desired volume - the
"10 ml" mark on a 10 ml pipette is the tip of the pipette itself!.
To-deliver pipettes require you to leave the remainder of the liquid below the
"10" mark in the pipette as waste - the "10 ml" mark can be
seen near the tip of the pipette. [Pipettes
come in 1 ml, 5 ml, and 10 ml sizes. Be sure to always check for the size of
your pipette by reading the numbers at the top (the number before the word
"in")]
Pipetting is accomplished using a pipette pump (image right). Blue-colored
pumps
accommodate 1 - 2 ml pipettes, and green-colored pumps accommodate 5 and 10 ml
pipettes. Once securely pushed into the rubber socket, liquid is pulled into the
pipette by turning the wheel, and is released again by turning the wheel in the
other direction or pushing down on the top of the pipette.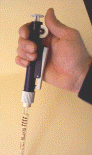
For smaller volumes (1.0 ml and less), you will usually use a micropipettor along with sterile plastic pipette tips. The two most common sizes of micropipettors are the P1000 (useful for pipetting 100 - 1000 ul) and the P200 (for 20 - 200 ul). The P1000 usually has a blue "P1000" symbol and uses blue-colored pipette tips. The P200 has a yellow "P200" symbols and uses yellow pipette tips. When using these pipettors, first turn the dial to the correct setting for the volume you need to pipette (keep in mind the numbers are in microliters). Next, attach the correct-size tip from the sterile container. Next, push the plunger down until you reach the stop (the plunger can go in further, but this is only for ejecting any left-over fluid from the pipette tip. Try getting a feel for when you reach the first and second 'stop' when you first pick up the pipettor). With the plunger held down, submerge the pipette tip in the liquid you wish to piette, then slowly allow the plunger to come out again. If you let go of the plunger too quickly, you may suck fluid into the barrel of the pipettor. Lastly, you can eject the liquid by pressing down on the plunger all the way to the second stop.
The objective of today's lab exercise will be to practice the aseptic transfer of bacteria from a test tube to other culture media, as well as the transfer of liquids using pipettes.
© 2003 - 2017 José de Ondarza, Ph.D.